


Introduction
Grinding concrete, mortar, thinset, or stone is one of the fastest ways to turn a clean job into a dust storm. Fine dust can clog your wheel, hide your cut/level line, and make a mess of finished spaces. If you’re a distributor, a professional craftsperson, or a DIY enthusiast, the right setup isn’t just about buying a shroud—it’s about matching every component to your tool, task, and workspace.
This guide shows how to find the perfect grinding dust shroud for angle grinder and vacuum cleaner by checking fit, mounting style, hose compatibility, visibility, brush seal, wheel pairing, and airflow. The goal is simple: consistent dust control that doesn’t slow you down or require constant adjustments.
Step-by-Step Guide to Find the Perfect Grinding Dust Shroud
Step 1: Confirm grinder size
Before you buy anything, match the shroud to your grinder’s working diameter. Most handheld surface grinding is done on 4-1/2 in. to 5 in. (115–125 mm) grinders, while larger floor or high-coverage work may push you to 7 in. (180 mm). Measure the cup wheel you plan to run (not just the grinder label), then confirm the shroud is designed for that same diameter so you don’t end up with rubbing, a partially blocked port, or a skirt that never seals.
A practical check is to remove your existing guard, then measure clearance around the spindle area and note any bulky gear housing shapes. If your grinder is a common 4-1/2 in./5 in. platform, a 125 mm shroud keeps the tool compact while still covering the wheel. For larger surface areas where you want faster coverage, a 180 mm (7 in.) shroud can reduce passes because you’re grinding a wider path per move.
Step 2: Match shroud mounting style
A dust shroud only works if it stays stable under load. Mounting style matters because grinding is a side-load operation: if the shroud shifts, your brush seal breaks, dust escapes, and the wheel may start rubbing the skirt. Start by checking how your grinder’s guard attaches (clamp band, quick-release lever, or proprietary collar), and look for shrouds that use a secure clamp or quick-mount system designed to resist rotation.
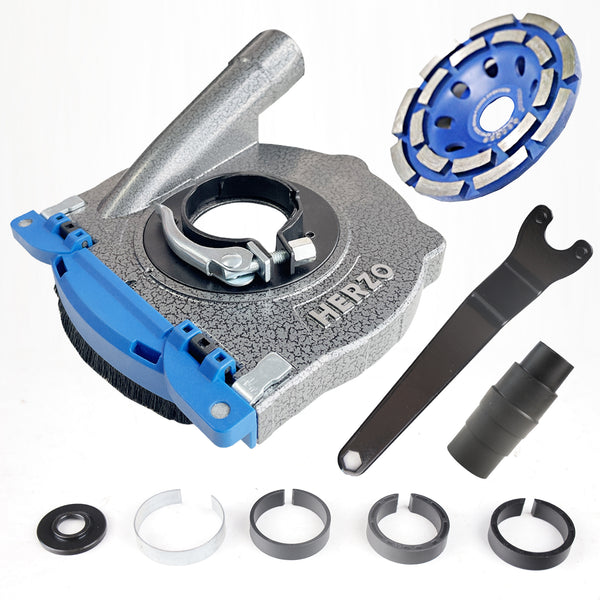
If you expect frequent on/off changes—like swapping between open grinding and dust-controlled grinding—quick-mount designs can save time while still holding position. For mixed fleets (common for a distributor, a professional craftsperson, or a DIY enthusiast supporting multiple tool brands), adapters are often the difference between “fits on paper” and “fits on the job.” For example, the HERZO Aluminum Dust Shroud Kit model HED50V is built around a rigid aluminum housing and includes adapters listed for 40–50 mm tool necks, which can improve real-world fitment success across different grinders.
Step 3: Verify vacuum hose compatibility
To find the perfect grinding dust shroud for angle grinder and vacuum cleaner, you have to treat the vacuum connection like part of the tool—not an afterthought. The most common failure mode is simple: the port doesn’t match your hose, so you “make it work” with tape, which leaks air and destroys suction where you need it most (at the brush line).
Do three checks:
-
Measure your vacuum hose outer diameter and compare it to the shroud’s port size.
-
Confirm adapter inclusion: check if the shroud comes with adapter pieces (or uses a standard adapter style you already own).
-
Evaluate hose routing: if the hose is heavy and pulls sideways, it can twist a weaker shroud out of alignment. A front vacuum port layout can help keep the hose forward and reduce snagging when you’re moving along a wall run.
For concrete grinding tasks that generate respirable silica, OSHA’s construction silica standard emphasizes using a grinder equipped with a commercially available shroud and dust collection system, and it includes specific performance requirements for the dust collector in Table 1 contexts (including filtration efficiency and airflow requirements).

Step 4: Choose shroud visibility and access
Visibility is a productivity feature. When you can see the contact patch, you control the grind pattern, avoid digging, and keep your overlap consistent. If you’ve ever “lost” your pencil line under dust or had to stop repeatedly just to check progress, you already know why clear housings matter.
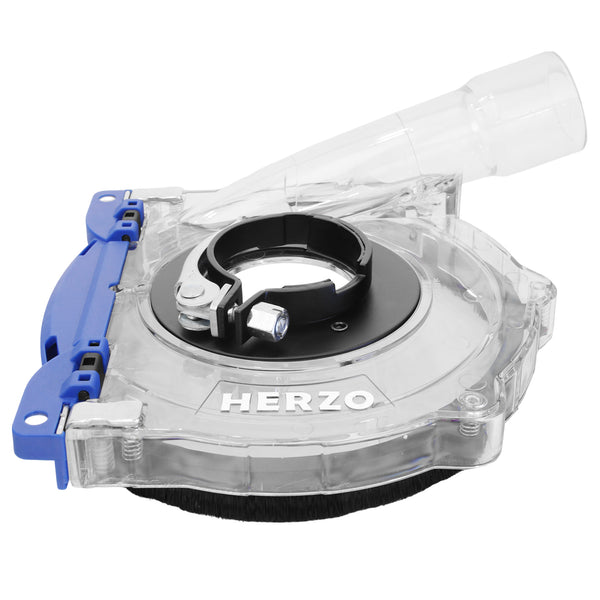
A clear-top shroud is especially helpful when flattening high spots, feathering a patch edge, or dressing thinset ridges without overcutting the substrate. The HERZO HDE45X uses a clear top to improve sightlines while still maintaining a brush-ring seal and front port extraction. For many crews, this is the sweet spot: you get real-time visual feedback without removing dust control to “see what you’re doing.”
Also consider edge access. Some shrouds use a flip-up or detachable nose so you can grind flush to a wall or corner without removing the whole shroud. That feature matters most on perimeter work—baseboards, wall transitions, and doorway thresholds—where the last 1/2 inch of material determines whether the finished floor lies flat.
Step 5: Select brush ring for surface
The brush ring is where dust control becomes real. A good brush ring creates a flexible seal against uneven concrete while still letting the tool glide. If the brush is too stiff or too tall, it can drag, chatter, or lift the shroud so the wheel barely contacts the surface. If it’s too soft or worn, the seal opens up and dust jets out behind you.
Start by matching brush behavior to the surface:
-
Rough concrete: use a brush with enough compliance to follow texture without “skipping.”
-
Smooth overlay/polished surfaces: use a brush that glides without grabbing to keep the grinder flat and reduce swirl marks.
Brush height also interacts with wheel wear: as your cup wheel diameter effectively reduces with use, a shroud with height adjustment can maintain the right clearance and keep the brush sealing.
If you regularly do close-to-edge grinding, look for designs that pair brush extraction with an edge-access feature. HERZO’s 125 mm aluminum kits emphasize brush-ring extraction plus edge access (flip-up nose on certain models), which is the practical combination that keeps dust controlled even when you’re not grinding in the middle of an open slab.
Step 6: Pair with correct grinding wheel
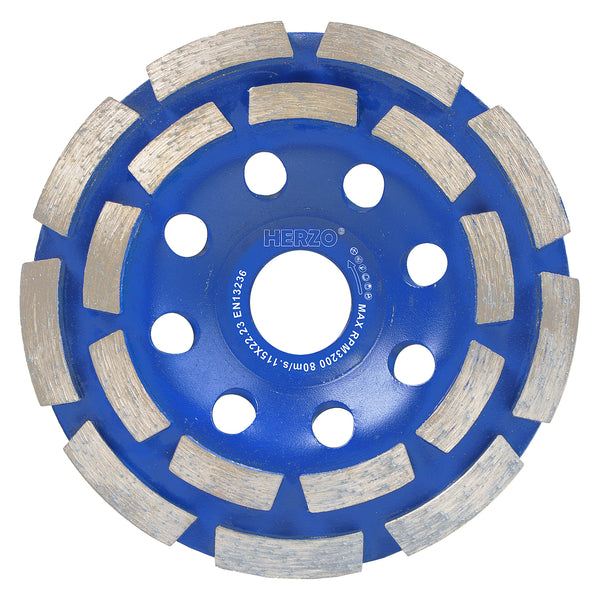
A dust shroud can’t compensate for the wrong wheel. To find the perfect grinding dust shroud for angle grinder and vacuum cleaner, confirm the cup wheel’s diameter, arbor size, maximum RPM rating, and intended material. For concrete and stone, segmented double-row cups and turbo-style cups are common because they remove material quickly while managing heat.
For example, the HERZO HSO4.1T Segmented Double‑Row Grinding Cup 115 mm (Blue) is specified as 115 mm diameter with a 22.23 mm arbor and notes a max of 13,200 RPM under EN13236 guidance. The description also highlights eight cooling holes to help regulate temperature and reduce wear, which matters because overheating increases glazing, slows cutting, and can soften bonding in some wheels.
If your shroud is 125 mm but you’re using a 115 mm wheel, that can still work—provided your shroud height adjustment can bring the brush seal down close to the surface. If you’re running a full 125 mm turbo cup wheel, a 125 mm shroud is the most direct match for coverage and suction efficiency.
Step 7: Validate airflow and clearance
Your final pass before grinding should be a “dry run” check—because most dust-control failures happen in the first 10 seconds. Follow this process:
-
Unplug/remove battery: mount the wheel and shroud, then spin the wheel by hand to confirm it doesn’t rub anywhere.
-
Connect hose: make sure the hose doesn’t force the shroud to tilt when you set the grinder down.
-
Power on: turn on the vacuum first, then start the grinder. Set the shroud flat and listen—if you hear rubbing, stop immediately and adjust height or confirm you’re using the correct shroud size.
-
Check suction: if suction seems weak, inspect for a clogged filter, kinked hose, or poor adapter seal. Watch dust behavior at the perimeter—good airflow pulls dust inward toward the port, not outward behind the brush line.
For larger area grinding with a 7 in. grinder, the shroud must maintain rigidity so it doesn’t flex under load. The HERZO Aluminum Dust Shroud 180 mm (7 in.) is positioned for high-coverage concrete grinding and includes a flip-up edge design and adapters, which helps when you need both speed and stable dust capture on bigger surfaces.

Scenario Variations
If you’re a distributor, a professional craftsperson, or a DIY enthusiast, these common scenarios help you choose faster without guessing:
-
Concrete floor surface grinding setup: Prioritize a stable shroud with a consistent brush seal and enough coverage to keep overlap clean. A 125 mm system is maneuverable for spot leveling; a 180 mm shroud helps on larger slabs where pass count drives labor.
-
Wall edge grinding near corners: Choose a shroud with a flip-up or detachable nose so you can grind flush without removing dust control. Clear housings help you keep the wheel edge aligned to the wall transition.
-
Coating removal with heavy dust: Use a wheel optimized for removal rate and heat control, then pair it with strong vacuum suction and a good seal. Expect filter loading; plan for a filter-cleaning mechanism or frequent checks.
-
Tight spaces, low-clearance work: Compact 125 mm shrouds and a forward hose routing reduce snagging. If visibility is poor, a clear-top shroud makes controlled, shallow passes easier.
Prerequisites & Safety
Required Tools & Materials
-
Angle grinder compatible with the shroud size (commonly 4-1/2 in./5 in. for 125 mm, or 7 in. for 180 mm).
-
Grinding cup wheel matched to your material (concrete/stone/mortar vs. coatings/adhesives).
-
Dust shroud with brush ring to seal against the surface and capture debris at the source.
-
Shop vacuum/dust extractor with a suitable filter and a hose that can seal to the shroud port.
-
Hose adapters/clamps to avoid leaks at the connection point.
-
Hand tools for setup (wrench/spanner for wheel changes, plus any included hook wrench).
-
Marking tools and straightedge if you’re leveling to a line or feathering a patch edge.
Safety Considerations
Grinding dust is not “just messy.” It can include fine particulate that irritates lungs and eyes, and concrete dust can contain respirable crystalline silica. Use a dust shroud and vacuum, and wear appropriate PPE. OSHA’s silica rule and Table 1 approach highlight that task setup, dust control method, and respiratory protection depend on where you’re working (outdoors vs. indoors/enclosed) and how the task is performed.
-
Wear a proper respirator (not just a nuisance mask) when dust exposure is possible, especially indoors.
-
Use eye and hearing protection—grinding throws chips and runs at high RPM.
-
Power off before adjustments: unplug or remove the battery before changing shrouds, brush rings, or wheels.
-
Confirm RPM ratings: never exceed the wheel’s max RPM rating, and replace damaged wheels immediately.
-
Control the workpiece and stance: keep both hands on the tool, stay balanced, and avoid awkward hose pulls.
Troubleshooting
|
Problem |
Cause |
Solution |
|---|---|---|
|
Dust leaking around the edge |
Brush ring worn, lifted, or not sealing |
Replace the brush ring, lower/adjust shroud height, and keep the shroud flat with light, steady pressure. |
|
Shroud rubbing the wheel |
Wrong shroud size or incorrect height setting |
Stop immediately, confirm wheel diameter, then adjust height until the wheel spins freely with a small safety clearance. |
|
Poor suction / dust still escapes |
Clogged vacuum filter, leaky adapter, hose kink |
Clean/replace the vacuum filter, reseal the hose connection with the correct adapter, and shorten/straighten hose routing. |
|
Tool feels unstable or shroud rotates |
Mounting collar mismatch or clamp not tight |
Recheck mounting style, use the correct adapter/collar, and tighten the clamp evenly so the shroud can’t twist under load. |
|
Grinding is slow and heats up |
Wrong cup wheel type or excessive pressure |
Switch to a wheel designed for your material, let the diamonds cut (don’t force it), and make multiple shallow passes. |
FAQs
Not always, and that’s why fit checks matter. Even when two grinders share the same wheel diameter (like 4-1/2 in./5 in.), the guard mount style and neck dimensions can differ. Look for shrouds that list compatibility details (for example, adapter coverage for different neck sizes) and test for rotation resistance after clamping. If you’re supporting multiple users as a distributor, a professional craftsperson, or a DIY enthusiast, keeping notes on which shrouds fit which grinder families saves time later.
A clear shroud isn’t mandatory, but it’s one of the easiest ways to improve control. When you can see the contact patch, you’re less likely to dip an edge, chase a low spot, or grind past your intended feather line. Clear housings are especially useful for indoor leveling, patch blending, and edge work where accuracy matters. If you often grind near finished surfaces, visibility can reduce the number of “check and correct” stops.
Airflow and filtration are the big two. Strong airflow helps pull dust inward before it escapes the brush line, while effective filtration prevents fine dust from blowing back into the room. Also consider practical features like a filter-cleaning mechanism and a hose that won’t kink under movement. Finally, remember that suction can drop fast as filters load, so plan for periodic checks during heavy grinding.
Clogging usually comes from a combination of high debris volume and restricted airflow. Use a wheel that evacuates dust well (segment layouts and cooling holes can help), keep the vacuum filter clean, and avoid collapsing the brush ring completely with excessive downward pressure. If you notice the tool “skating” on debris, stop and let the vacuum clear the cavity, then resume with slower passes. In very dusty coating removal, shorter grinding intervals with quick suction checks can keep performance consistent.
Conclusion
Finding the perfect grinding dust shroud for angle grinder and vacuum cleaner comes down to a repeatable checklist: confirm size, match the mount, seal the hose connection, choose visibility and edge access, tune the brush ring, pair the right cup wheel, then validate clearance and airflow before you commit to a full pass. When those pieces work together, grinding becomes cleaner, steadier, and easier to control—especially on indoor concrete and masonry tasks. Recheck fit and suction any time you change wheels or move to a new surface, and you’ll get the dust-control performance you expected from the start.


