


Introduction
Concrete grinding and cutting can remove coatings, flatten high spots, and prep surfaces, but it also creates a dense dust cloud that clogs tools and lingers in the air. A good dust shroud is essential to control this mess, as it contains debris while your vacuum pulls it away. This guide helps you choose a dust shroud that fits your grinder and vacuum, ensuring effective dust collection in real-world conditions. You’ll learn about important factors like diameter, interface, airflow, brush design, and edge access, with HERZO dust shrouds as practical examples for heavy-duty work.
Dust Shroud and Vacuum Fundamentals
Grinder compatibility 101: size, guard interface, and wheel clearance
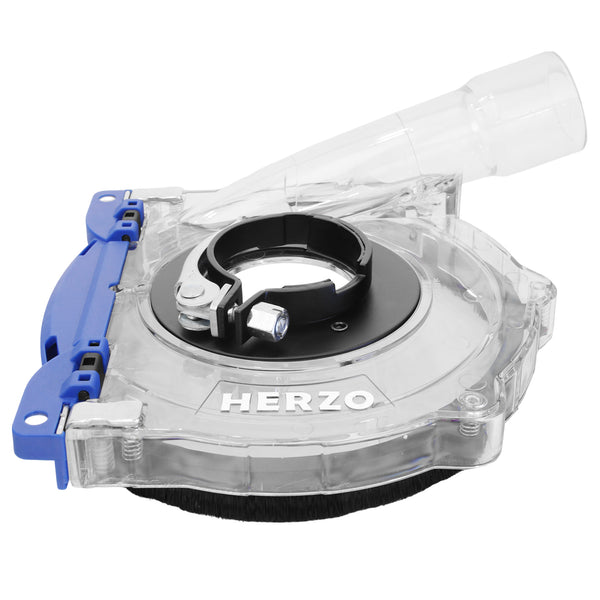
Dust shrouds are not universal in the way many people hope. Compatibility starts with grinder size, typically 125 mm (5 in / 4.5 in class) or 180 mm (7 in class). The shroud needs to match the tool’s guard mounting method—common interfaces include clamp-style collars and quick-fit/bayonet arrangements depending on grinder design. Fitment matters because tiny gaps at the interface can become major leak points once the wheel starts throwing dust.
Wheel clearance is just as important. Grinding cup wheels and cutting discs have different thicknesses, profiles, and working angles. A shroud designed for grinding needs internal volume that allows a diamond cup wheel to run without rubbing, while still keeping the extraction port close enough to maintain airflow. If clearance is too tight, you’ll get rubbing, heat, and premature brush wear; if it’s too open, you lose capture efficiency.
Grinding vs cutting shrouds: why one size/design doesn’t fit all
Grinding produces a broad plume of fine dust plus heavier debris; cutting often produces a narrower stream but can throw material forward and downward. A grinding shroud is usually built around a brush skirt that maintains contact with the surface while allowing lateral movement and slight tilt. A cutting shroud often needs better line-of-cut visibility and geometry that lets the disc approach the work without the skirt snagging.
If you use a grinding shroud for cutting, you may fight visibility and binding; if you use a cutting shroud for grinding, you may have poor sealing around the cup wheel. The best approach is to choose a shroud designed for the task, then match the extraction port to your vacuum hose so the system stays balanced.
Application Module 1: Surface Grinding for Concrete Prep
Surface grinding is the backbone of concrete preparation: removing thinset residue, flattening high spots, opening the surface for coatings, or smoothing patch work. The challenge is that grinding generates very fine dust that spreads across the slab, especially in enclosed rooms where air movement keeps particles suspended. For best results, treat grinding as a controlled system: keep the shroud skirt in light contact with the slab, maintain steady travel speed (don’t hover in one place), and avoid aggressive tilt that lifts one side of the brush ring.
A practical workflow is to “map the room” into lanes, overlap passes by about 25–35%, and pause periodically to check vacuum suction at the shroud. If you see dust trailing behind, it usually means the brush isn’t sealing (worn skirt or uneven slab) or the vacuum airflow is dropping (filter loading, kinked hose, full container). If the grinder is pulling too hard and feels stuck, you may have an overly tight seal; slightly adjust technique so the skirt glides rather than drags.
HERZO’s clear 125 mm class grinding shrouds are useful here because visibility helps you track edge contact and swirl marks as you move. The clear body also makes it easier to spot internal buildup before it becomes a clog. When paired with a diamond turbo cup wheel kit, the setup becomes a straightforward “prep module” for common renovation work—especially in apartments, basements, and other dust-sensitive spaces where cleanup time can rival grinding time.
Application Module 2: Edge and Corner Work Without Losing Suction

Edges and corners expose the limits of many dust shrouds. The moment you bring a grinder close to a wall, you often have to lift or angle the tool, which breaks the perimeter seal and lets dust escape. That is why edge work requires a different mindset: you’re managing both geometry and airflow. Plan edge passes as a separate step, keep the hose routed so it doesn’t pull the grinder away from the wall, and consider whether your shroud design allows partial open-edge grinding without turning the whole skirt into a leak.
A reliable method is to do the field (open floor) first, then approach edges with controlled, shallow passes. If the slab is uneven, avoid forcing the brush to bend sharply; instead, let the grinder float and make two lighter passes. You can also “feather” the last 10–20 mm near the wall so you don’t create a ridge while trying to maintain suction.
HERZO’s universal-style shrouds (including the red housing variant) are built for rugged work where the shroud may get bumped, dragged, and exposed to continuous abrasive debris. For edge work, durability matters because brush rings and housings take direct contact. A sturdier body reduces flex, which helps keep the skirt alignment consistent—one of the overlooked factors in edge dust control.
Application Module 3: Dust-Controlled Cutting for Renovation and Repairs

Cutting channels for plumbing, electrical conduit, or crack chasing is one of the fastest ways to contaminate a worksite with fine dust. Unlike grinding, cutting can eject debris in a concentrated stream—often forward and downward—so the shroud must manage both containment and visibility. The most effective technique is to keep the shroud stable, start the cut gently to establish a kerf, and then maintain a consistent feed rate so the disc doesn’t bind and throw extra dust.
For indoor renovation, it helps to think in layers of control: first contain the dust at the blade with a cutting shroud, then move it efficiently with the vacuum, and finally protect the workspace with simple barriers (doorway plastic, negative-air fan if needed). On the tool side, avoid forcing the disc sideways; side loading increases heat and can deform or wear components that affect how well the shroud seals.
A transparent cutting shroud like the HERZO 125 mm transparent cutting model supports controlled line-of-cut work because you can see where the disc is tracking without lifting the shroud. That matters more than people expect: every time you lift to check alignment, you break the seal and dump dust into the air. With a clear view, you can keep the shroud down, keep suction consistent, and keep cleanup minimal.
Application Module 4: Heavy-Duty 180 mm Grinding for Larger Areas

When you scale up to a 180 mm (7 in) grinder, you’re usually chasing productivity: more coverage per pass, faster coating removal, and better flattening across wider areas. The trade-off is that bigger grinders generate more debris volume, and weak shrouds can flex, crack, or leak under continuous load. Here, selection is less about “will it fit” and more about whether it will remain stable after hours of work.
Technique also changes slightly. Larger grinders have more inertia, so you want smoother direction changes and a steadier stance to keep the brush ring evenly seated. Because you’ll be moving more material, your vacuum must keep up—if airflow drops, dust will escape quickly simply because there’s too much debris for the shroud to contain. A good habit is to check the hose and vacuum filter at set intervals rather than waiting for performance to drop.
HERZO’s 180 mm aluminum dust shroud is designed for this kind of heavy-duty environment. Aluminum construction can help resist deformation and impacts, and it tends to hold alignment better than thinner materials when dragged across uneven slabs. In practical terms, that stability supports more consistent suction around the skirt, which is what you need when you’re trying to keep a large-area grinding job “dust controlled” rather than merely “less dusty.”
Buying Guide: How to Choose the Right Dust Shroud
Step 1: Match grinder diameter and mounting interface
Start with the non-negotiables: shroud diameter and how it mounts to your grinder. A 125 mm shroud generally fits the 4.5–5 in grinder class, while 180 mm fits the 7 in class. Next, confirm whether your grinder uses a clamp collar, a guard-style mount, or a quick/bayonet interface. If you choose a shroud that “almost fits,” you’ll fight leakage at the mount and constant adjustments.
A practical check is to verify that once installed, the shroud sits square to the wheel and doesn’t wobble. Wobble is often mistaken for wheel imbalance, but it can come from a loose or mismatched mounting interface. Over time that movement also accelerates brush wear and makes dust control less consistent.
Step 2: Choose grinding vs cutting designs based on workflow
Choose a grinding shroud when you’re using a cup wheel for surface prep, leveling, or coating removal. Choose a cutting shroud when you need line visibility and disc access for channels and repair cuts. If you do both regularly, consider keeping two shrouds rather than swapping configurations constantly; switching increases the chance of running a compromised setup “just for this one job.”
Transparent housings help in both cases because they reduce the temptation to lift the shroud to check your work. That keeps negative pressure stable and reduces the dust bursts that happen when the seal breaks.
Step 3: Validate vacuum and hose compatibility (port size + restrictions)
Even a great shroud fails with poor airflow. Ensure your hose seats securely on the shroud’s extraction port and that you’re not introducing leaks at the connection. Keep the hose as short as the job allows and avoid sharp bends. If your vacuum uses fine filters, clean or cycle them frequently; in high-dust grinding, filter loading is often the limiting factor, not the shroud.
For silica-containing dust, filtration and dust capture matter because respirable particles can be small enough to remain airborne and reach deep into the lungs. NIOSH highlights silica as a significant construction hazard and emphasizes control measures like wet methods and local exhaust ventilation. (cdc.gov/niosh)
Step 4: Pick the brush ring and edge access that fits your surfaces
Brush rings are your “seal,” but the right stiffness depends on the surface. Softer brushes conform better to uneven slabs and textured coatings, while stiffer brushes may glide better on smoother concrete but can leak on rough spots. Think about how often you’ll work near walls; some designs allow closer edge access, while others prioritize full perimeter sealing for open floors.
Quick comparison table
|
Job Scenario |
What Matters Most |
Recommended Shroud Traits |
Common Trade-Off |
|---|---|---|---|
|
Open-floor surface prep |
High capture rate, durability |
Full brush skirt, stable housing, strong airflow path |
Slightly less edge access |
|
Wall-adjacent grinding |
Edge reach + seal control |
Edge-capable skirt design, durable body |
May leak if lifted often |
|
Indoor channel cutting |
Visibility + directional containment |
Transparent cutting cover, stable port position |
Not ideal for cup-wheel grinding |
|
Large-area heavy removal |
Structural rigidity |
Metal/aluminum body, consistent alignment |
Heavier and bulkier |
|
Repeatable straight channels |
Control + guidance |
Roller-guided shroud, consistent tracking |
More specialized setup |
FAQ
Q: What’s the difference between a grinding dust shroud and a cutting dust shroud? A: A grinding dust shroud is designed to enclose a cup wheel and maintain a perimeter seal while the grinder moves laterally across a surface. A cutting dust shroud prioritizes line-of-cut access and visibility, and it’s shaped to accommodate the approach angle of a cutting disc. If you try to grind with a cutting shroud, you often lose sealing and capture because the skirt geometry isn’t meant for broad dust plumes. If you try to cut with a grinding shroud, visibility and disc access can suffer, and you may end up lifting the shroud—breaking suction repeatedly.
Q: How do I know if my vacuum is strong enough for my shroud? A: A practical sign is capture behavior at the edge of the brush ring: with adequate airflow, dust should be pulled inward with minimal trailing plume. If dust “streams” out behind the grinder, airflow is likely dropping due to filter loading, hose restriction, or an undersized vacuum for the debris volume. Listen for pitch changes that indicate a clog, and check whether the hose is collapsing or kinked under suction. For heavy grinding, you generally need a vacuum built for fine dust with stable filtration performance over time.
Q: Why does dust still escape even when the shroud is installed correctly? A: Dust escape usually happens when the seal is broken or airflow is restricted. Uneven slabs, cracks, and textured coatings can create micro-gaps under the brush ring that let dust jet out. Another common cause is lifting or tilting the grinder to reach edges, which opens a large gap and releases a burst of dust. Finally, leaks at the hose connection or a worn brush ring can reduce negative pressure inside the shroud even if everything “looks installed.”
Q: Should I choose a transparent shroud or an opaque metal shroud? A: Choose transparent when visibility is critical—such as indoor cutting or detailed surface prep where you need to track your wheel position without lifting the tool. Transparency reduces the temptation to peek, which helps maintain suction and consistent dust control. Choose a metal or aluminum shroud when you expect heavy impacts, long duty cycles, or rough jobsite handling that can crack lighter housings. In practice, many pros keep a transparent 125 mm shroud for precision work and a heavier-duty shroud for large-area grinding.
Q: How often should I replace the brush ring on a dust shroud? A: Replace the brush ring when you see uneven wear, gaps, or when the bristles have shortened enough that the shroud no longer seals on flat sections. If you notice dust streaks that persist even with good vacuum suction and correct technique, the brush ring is one of the first components to inspect. Brush life depends on surface roughness, pressure, and how often the shroud is dragged laterally across abrasive edges. Keeping the skirt clean and avoiding excessive tilt can extend brush life significantly.
Q: Can I use one shroud for both 125 mm and 180 mm grinders? A: In most cases, no—diameter and mounting interfaces differ, and a shroud that doesn’t match the grinder size won’t align correctly with the wheel. Even if you could physically attach it, wheel clearance and skirt geometry would likely be wrong, leading to rubbing or poor dust capture. It’s better to select a shroud specifically designed for your grinder class (125 mm vs 180 mm) and your task (grinding vs cutting). Doing so also reduces setup time and lowers the risk of leaks at the mount.
Q: What’s the best way to improve dust control without buying a new shroud? A: Start by restoring airflow: clean or replace filters, empty the vacuum, and remove hose restrictions like kinks or sharp bends. Next, inspect the brush ring and the extraction port for cracks, misalignment, or internal buildup that could reduce flow. Adjust technique so the brush stays in contact with the surface, and avoid lifting the shroud to check progress—use lighting and positioning instead. If edge work is the main problem, consider changing your sequence (field first, edges last) so you minimize awkward angles that break the seal.
Conclusion
Choosing the best dust shroud for your grinder and vacuum comes down to system thinking: match the shroud to your grinder size and task, then ensure your vacuum and hose can maintain airflow under real dust loads. Transparent shrouds improve visibility and reduce “seal breaking,” while heavy-duty housings shine in long grinding sessions where rigidity and durability matter. If you align fitment, airflow, and technique, dust control becomes reliable rather than hopeful—and your jobsite becomes cleaner, healthier, and more efficient with every pass.


